Authorizing a Dalamud Plugin
The typical way of authorizing an app involves a redirect URI under the app's control. Since Dalamud plugins don't register any URIs or URI schemes system-wide, they cannot use that flow.
Instead, Central Archives provides an alternative mechanism of obtaining an access token for native apps, based on the OAuth 2.0 device flow. It was originally implemented specifically for the needs of a Dalamud plugin, and involves these four steps:
- Your native app registers an authorization request in background and receives a verification URI to open in the user's browser.
- Your app opens the verification URI in the browser and asks the user to approve your authorization request. The authorization server renders a consent page for your request.
- While waiting for the user's approval, the app periodically polls the authorization server for an access token using the device code it received alongside the verification URI.
- When the user approves your request, the app's polling will succeed and return the access token.
Before you rush to implement a device flow client in your Dalamud plugin, however, pause for a moment and read the next section.
You probably don't need this
If your plugin wants to consume the Roleplay API, it makes perfect sense for it to use the device flow, as it likely wants access to the Roleplay API to edit the user's roleplay data in-game. In fact, the device flow was added to Central Archives for the needs of the Roleplay Profiles plugin.
However, if you want to use the Identity API, then performing the authorization request client-side, in plugin code, is probably not the best idea.
Think about it. Who's really interested in the identity data returned by the API? The plugin itself, running in the FFXIV game process, probably isn't; its server is, and only there is one.
- The purpose of the User API is to establish a specific identity for the user and enable single sign-on. Contacting an external identity provider for single sign-on is something the server should be doing, not the client.
- The purpose of the Character API is to establish the user's ownership of characters. But the plugin itself already knows the user owns the character they're playing, because they're playing that character right now. It's your plugin server that's interested in the Character API; it's your server that will need an assurance that your plugin client is acting on a specific character's behalf, and the proper way to do that is to start a session for the plugin client and then authenticate a Central Archives character within that session, server-side.
If you're still interested in authorizing a Dalamud plugin (or another native app without URI registration) for either the Identity API or the Roleplay API, read ahead.
Obtaining a device code and verification URI
First, from your plugin (or other native app), make a background POST request to:
https://centralarchives.org/oauth/device/code
The request body is an HTML form of type application/x-www-form-urlencoded, which must include two mandatory form parameters:
client_id: Your app's client ID. You can find it on the app edit page. Example:4bdef73a-3e39-49fb-bb4b-685cc2650901.scope: The list of scopes (permissions) you're requesting, as a single string with individual scopes separated by spaces. Example:idp:character:?.read idp:user.read idp:user:email.read. For more details, see Scopes and Permissions.
Optionally, you can also send a PKCE code challenge. In this case, your code verifier used to generate the code challenge will be validated at the last step of the flow.
code_challenge_method: The value of this query paramater must beS256.code_challenge: A single-use value unique to this request, your PKCE code challenge. If you're using a client library, it will typically take care of computing this for you. If you're doing everything manually (not recommended), refer to the link for the details on computing a code challenge.
Note
Unlike the authorization code flow, Central Archives does not require PKCE for the device flow.
The server will return a JSON response:
{
  "device_code": "<device code>",
  "user_code": "<user code>",
  "verification_uri_complete": "https://centralarchives.org/<implementation_defined>",
  "interval": <polling interval, in seconds>,
  "expires_in": <code expiry, in seconds>
}
Example:
{
    "device_code": "kpgdvmlz7r4arbplrcs5326zsbwcxrerp5n5c2js",
    "user_code": "TV4M-RSAX",
    "interval": 5,
    "expires_in": 600,
    "verification_uri_complete": "https://centralarchives.org/oauth/device/verify/n6eyidi3r66qdanhkiliyrkxnss22ltrohxxrmnk"
}
Here's what the fields mean:
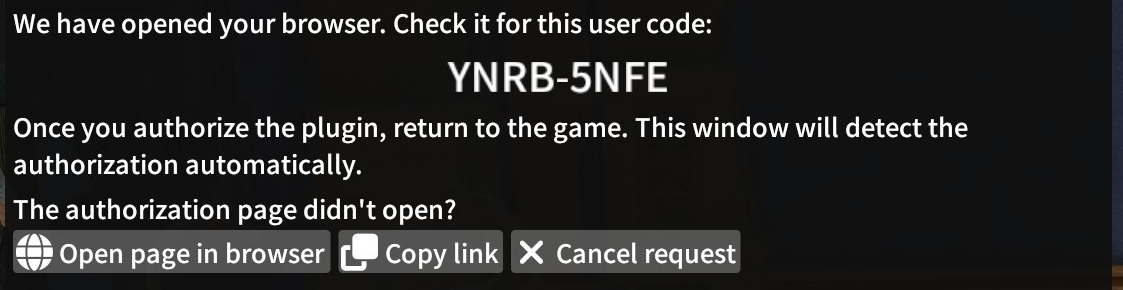
verification_uri_completeis the link you will open in the browser so the user can approve your authorization request.user_codeis a short code that you should display in your UI so the user can match the authorization request to your app.expires_inis the number of seconds before your request expires.intervalis the frequency (in seconds) with which your app should poll for the access token.device_codeis a secret code you will use to poll for the access token.
Now open verification_uri_complete in the browser and notify the user about it. Here's an example UI, as implemented in the Roleplay Profiles plugin:
Poll for the access token
While you're waiting for the user to approve (or possibly deny) your request, poll the authorization server for the access token. You should do it with an interval of interval seconds.
To poll, send a POST request to the token endpoint:
https://centralarchives.org/oauth/token
The request body is an HTML form of type application/x-www-form-urlencoded, which must include these form parameters:
client_id: Your app's client ID.device_code: the device code you received when registering your authorization request.grant_type: The value of this form parameter must beurn:ietf:params:oauth:grant-type:device_code.
If you sent a PKCE code_challenge with the initial request, you must also provide a fourth form parameter:
code_verifier: The PKCE code verifier that you used to generate the code challenge.
Special responses
If the user hasn't yet approved or denied your authorization request, the server will reply with a 400 Bad Request response with the following JSON body:
{
    "error": "authorization_pending",
    "error_description": "Authorization pending"
}
In this case, the app should try again after interval seconds.
If you're polling too frequently (that is, more frequently than the server recommended), the server may reply with a 400 Bad Request response with the following JSON body:
{
  "error": "slow_down",
  "error_description": "Slow down"
}
In this case, reduce the frequency of requests to the recommended value.
If the user denies your request, the token response will fail with
{
  "error": "access_denied",
  "error_description": "Access denied by user"
}
Any other error response indicates that the authorization request failed.
The consent page
Once the verification_uri_complete opens, assuming the request is well-formed and the user hasn't blocklisted your app outright, the browser will show the consent page. It will display the user_code you were given, so the user can check that it matches, and the authorization server will also warn the user if the request was made from a different IP address (which shouldn't happen, as both the game and the browser are running on the same machine).

The user must approve at least one of the scopes your app has requested (besides offline_access), or deny the request outright. Therefore, if the authorization server redirects with a successful response, your app can be certain that at least one of the requested scopes (besides offline_access) was granted.
Obtaining the access token
Once the user approves your authorization request, the next time you poll the token endpoint, it will return a 200 OK JSON response.
{
  "token_type": "Bearer",
  "access_token": "<access token>",
  "refresh_token": "<refresh token (if offline_access was requested, otherwise absent)>",
  "expires_in": <seconds until the access token expires>,
  "scope": "<scopes actually granted, separated by space>"
}
The access_token value is what you will pass in the Authorization: Bearer header when calling protected APIs.
You probably don't need this, redux
As said above, the device flow was implemented for Dalamud plugins that need to consume Central Archives APIs directly from the game process, which makes sense for the Roleplay API, but probably not for the Identity API.
Suppose your plugin server relies on your plugin client to obtain an Identity API access token so it can sign the user in for your plugin session. If your server just blindly accepts any access token as proof of user or character identity, then you've opened yourself to a client impersonation attack.
Imagine this scenario:
- An evil app masquerading as a legitimate app opens its own authorization request. The user clicks Authorize to let Ackbar's Perfectly Safe Raid Statistics access their character identity.
- The evil app then passes its access token to your server as a login credential, masquerading as your plugin or, worse, the browser.
- Your server contacts the Character API with the access token, sees a legitimate API response, and logs the evil app in, giving it access to the user account.
Therefore, your server must never accept Central Archives access tokens from an untrusted source as security credentials. Your server could, in theory, call the token introspection API (to come) to check the client ID that the token was issued to, but it would still be no guarantee that it was indeed your plugin that obtained the access token. (For example, Ackbar's Perfectly Safe Raid Statistics could have used your plugin's client ID, and the user could have blindly clicked Authorize without noticing that the consent screen displayed your app name.)
The most secure solution is to move the authorization request to the server side. You can implement your own "device flow" atop the Central Archives authorization code flow, like this:
- Your plugin calls your server to start a session, receiving a unique session ID and a URL to open in the browser. That URL will be the regular authorization URL with your server app's
client_id. - Your plugin opens the provided URL in the browser.
- The user authorizes the request, and the authorization server redirects the browser to your server, which receives the authorization code and obtains the access token. Your server will use the
stateparameter to identify this completed authorization request with your plugin session. - Your server signals your plugin somehow (e.g. via polling or WebSockets), letting it know that its session is now authenticated as the user or character.
- The plugin uses the session ID provided by your server to make authenticated requests.